How to Plan and Renovate a Bathroom with a Vintage Touch
- Revived And Restored Furniture
- Apr 25, 2025
- 3 min read

Updated: May 12, 2025
Renovating a bathroom is one of the most rewarding home projects you can undertake. It's a chance to combine modern comforts with timeless design, and there's no better way to add character and charm than by incorporating a vintage bathroom vanity. At Revived and Restored, we specialise in giving beautiful vintage pieces a new lease of life—perfect for creating a unique bathroom that tells a story.

Step 1: Define Your Vision When Planning A Vintage Bathroom
Before starting your renovation, take a moment to envision your dream bathroom. Consider your lifestyle, aesthetic preferences, and practical needs. Are you drawn to the elegance of Edwardian design or the rustic charm of farmhouse decor? A clear vision will guide your design decisions and help create a cohesive, functional space.
Step 2: Plan Your Layout and Timeline
Functionality is essential. Assess your needs: Do you require a double sink? Is storage a priority? Would a freestanding tub fit your space? Once your layout is decided, timing is everything.
Understand Your Plumbing Schedule
First Fix: Your plumber installs pipework and wiring before the walls and floors are finished. Ensure your layout and plumbing positions are finalised.
Second Fix: This stage involves installing taps, sinks, your vintage vanity, and other fixtures. All items must be on-site and ready.
Advance planning prevents costly delays and ensures seamless installation.
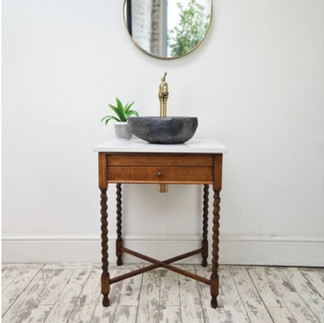
Step 3: Choose a Vintage Vanity That Speaks to You
At Revived and Restored, each vanity is thoughtfully sourced and restored to preserve its vintage appeal while ensuring it's practical for modern use.
Bespoke Vanity Units (6–8 Weeks Lead Time)
We offer a bespoke service that transforms antique chests of drawers, sideboards, or dressing tables into custom vanities. Allow 6–8 weeks for sourcing, customisation, and delivery.


Examples of our transformations, before and after images
Basin Styles: What’s Right for You?
Top-mounted Basins: sit on top of the unit and make a visual statement—ideal for showcasing vintage woodwork. View example
Undermounted Basins: Installed beneath the counter for a sleek, minimalist look and easier cleaning. View example
Revived and Restored transformations


Tap Configuration: Consider Style & Practicality
Wall-Mounted Taps: Save counter space and suit contemporary designs. You need exact plumbing planning with this option, so it's a good idea to have the unit on site if possible. Therefore, planning ahead is key. Example
Counter-Mounted Taps: Traditional and easy to fit, suitable for most vintage vanities. Example


Step 4: Coordinate Fixtures and Finishes
Choose materials and finishes that complement your vanity. Aged brass taps, period-style tiles, and natural stone counters can harmonise beautifully with your restored piece. Aim to blend vintage charm with modern function.
Step 5: Prioritise Lighting and Ventilation
Layer your lighting with ambient, task, and accent fixtures. Statement pendants or wall sconces can reflect the era of your vanity. Ensure strong ventilation to protect your restored wood from humidity damage.
Step 6: Add Character with Personal Touches
Incorporate antique mirrors, vintage artwork, or upcycled shelving to personalise your space. These details will tie the look together and bring your vision to life.
Bringing It All Together
Planning a bathroom renovation is a rewarding blend of creativity and practicality. A vintage vanity from Revived and Restored not only enhances the style of your bathroom but also becomes its focal point.
Start your journey today — browse our vintage vanities or learn more about our bespoke service.
Comments